Minimal 3DP Projects, Ideas, and Links
This section is my attempt to document my projects, ideas, and other informational links/references.
This is the multi-page printable view of this section. Click here to print.
Minimal 3DP Projects, Ideas, and Links
This section is my attempt to document my projects, ideas, and other informational links/references.
As I am putting together this site, I thought it was important to try to document my projects.
For the most part I will try to document each project as I put it together. This will include references, tools, printers, settings, and anything else I need to remember.
This site is built with Hugo. I am utilizing the Docsy theme by Google. As a side note, I have found it easy to use and I like the documentation.
3D Printers
Ender 3 S1 Plus
Ender 3 S1 Plus landing page.
Ender 3 S1 Plus with the default Creality Board
# !Ender-3 S1 Plus
# printer_size: 300x300x300
# version: 3.6
# This file contains pin mappings for the stock 2021 Creality Ender 3
# S1 & S1 Pro. To use this config, check the STM32 Chip on the
# Mainboard, during "make menuconfig" select accordingly either the
# STM32F103 with "28KiB bootloader" or the STM32F401 with
# "64KiB bootloader" and serial (on USART1 PA10/PA9) for both.

# For a direct serial connection, in "make menuconfig" select
# "Enable extra low-level configuration options" and  Serial
# (on USART2 PA3/PA2), which is on the 10 pin IDC cable used

# Flash this firmware by copying "out/klipper.bin" to a SD card and
# turning on the printer with the card inserted. The filename
# must be changed to "firmware.bin"

# With STM32F401, you might need to put "firmware.bin" in a
# folder on the SD card called "STM32F4_UPDATE" in order to flash.

# See docs/Config_Reference.md for a description of parameters.


###fluidd set
[include cx_printer.cfg]

[display_status]

[pause_resume]

[gcode_macro PAUSE]
description: Pause the actual running print
rename_existing: PAUSE_BASE
# change this if you need more or less extrusion
variable_extrude: 1.0
gcode:
  ##### read E from pause macro #####
  {% set E = printer["gcode_macro PAUSE"].extrude|float %}
  ##### set park positon for x and y #####
  # default is your max posion from your printer.cfg
  {% set x_park = printer.toolhead.axis_maximum.x|float - 5.0 %}
  {% set y_park = printer.toolhead.axis_maximum.y|float - 5.0 %}
  ##### calculate save lift position #####
  {% set max_z = printer.toolhead.axis_maximum.z|float %}
  {% set act_z = printer.toolhead.position.z|float %}
  {% if act_z < (max_z - 2.0) %}
      {% set z_safe = 2.0 %}
  {% else %}
      {% set z_safe = max_z - act_z %}
  {% endif %}
  ##### end of definitions #####
  PAUSE_BASE
  G91
  {% if printer.extruder.can_extrude|lower == 'true' %}
    G1 E-{E} F2100
  {% else %}
    {action_respond_info("Extruder not hot enough")}
  {% endif %}
  {% if "xyz" in printer.toolhead.homed_axes %}
    G1 Z{z_safe} F900
    G90
    G1 X{x_park} Y{y_park} F6000
  {% else %}
    {action_respond_info("Printer not homed")}
  {% endif %}

[gcode_macro RESUME]
description: Resume the actual running print
rename_existing: RESUME_BASE
gcode:
  ##### read E from pause macro #####
  {% set E = printer["gcode_macro PAUSE"].extrude|float %}
  #### get VELOCITY parameter if specified ####
  {% if 'VELOCITY' in params|upper %}
    {% set get_params = ('VELOCITY=' + params.VELOCITY)  %}
  {%else %}
    {% set get_params = "" %}
  {% endif %}
  ##### end of definitions #####
  {% if printer.extruder.can_extrude|lower == 'true' %}
    G91
    G1 E{E} F2100
  {% else %}
    {action_respond_info("Extruder not hot enough")}
  {% endif %}
  RESUME_BASE {get_params}

[gcode_macro CANCEL_PRINT]
description: Cancel the actual running print
rename_existing: CANCEL_PRINT_BASE
gcode:
  TURN_OFF_HEATERS
  {% if "xyz" in printer.toolhead.homed_axes %}
    G91
    G1 Z4.5 F300
    G90
  {% else %}
    {action_respond_info("Printer not homed")}
  {% endif %}
    G28 X Y
  {% set y_park = printer.toolhead.axis_maximum.y|float - 5.0 %}
    G1 Y{y_park} F2000
    M84
  CANCEL_PRINT_BASE

[stepper_x]
step_pin: PC2
dir_pin: PB9
enable_pin: !PC3
rotation_distance: 40
microsteps: 16
endstop_pin: !PA5
position_min: -5
position_endstop: -5
position_max: 305
homing_speed: 80

[stepper_y]
step_pin: PB8
dir_pin: PB7
enable_pin: !PC3
rotation_distance: 40
microsteps: 16
endstop_pin: !PA6
position_min: -2
position_endstop: -2
position_max: 305
homing_speed: 80

[stepper_z]
step_pin: PB6
dir_pin: !PB5
enable_pin: !PC3
rotation_distance: 8
microsteps: 16
endstop_pin: probe:z_virtual_endstop           #enable to use bltouch
#endstop_pin: !PA15                #disable to use bltouch
#position_endstop: -0.1
position_min: -10
position_max: 305
homing_speed: 4
second_homing_speed: 1
homing_retract_dist: 2.0

[extruder]
max_extrude_only_distance: 1000.0
step_pin: PB4
dir_pin: PB3
enable_pin: !PC3
rotation_distance: 7.74
microsteps: 16
nozzle_diameter: 0.400
filament_diameter: 1.750
heater_pin: PA1
sensor_type: EPCOS 100K B57560G104F
sensor_pin: PC5
#control: pid
# tuned for stock hardware with 200 degree Celsius target
#pid_Kp: 23.904
#pid_Ki: 1.476
#pid_Kd: 96.810
min_temp: 0
max_temp: 265

[idle_timeout]
timeout: 172800

[heater_bed]
heater_pin: PA7
sensor_type: EPCOS 100K B57560G104F
sensor_pin: PC4
#control: pid
# tuned for stock hardware with 50 degree Celsius target
#pid_Kp: 74.000
#pid_Ki: 1.965
#pid_Kd: 696.525
min_temp: 0
max_temp: 130


[verify_heater extruder]
check_gain_time: 200
hysteresis: 5

[fan]
pin: PA0
kick_start_time: 0.5

#set heater fan runnig with temperature over 60;
[heater_fan my_nozzle_fan]
pin: PC0
max_power: 0.8
shutdown_speed : 0
heater:extruder
heater_temp : 60
fan_speed : 1.0


[mcu]
serial: /dev/serial/by-id/usb_serial_1
restart_method: command

# [mcu rpi]
# serial: /tmp/klipper_host_mcu

# [adxl345]
# cs_pin: rpi:None
# spi_speed: 2000000
# spi_bus: spidev2.0

# [resonance_tester]
# accel_chip: adxl345
# accel_per_hz: 70
# probe_points:
#     150,150,10

[input_shaper]
shaper_type_x = mzv
shaper_freq_x = 59.2
shaper_type_y = mzv
shaper_freq_y = 30.0

[filament_switch_sensor filament_sensor]
pause_on_runout: true
switch_pin: ^!PC15


[bltouch]
sensor_pin: ^PC14       #signal check port ^stand for pull up
control_pin: PC13       #singal control prot
x_offset: -30.0
y_offset: -40.0
#z_offset: 0          #z off_set configuration
stow_on_each_sample = false #high speed for bltoch,
speed: 3.0
samples: 2
samples_result: median
sample_retract_dist: 6.0
samples_tolerance: 0.01
samples_tolerance_retries: 3

[safe_z_home]
home_xy_position:185,195
speed: 200
z_hop: 10
z_hop_speed: 10

[bed_mesh]
speed: 150
mesh_min: 25,30         #need to handle head distance with bl_touch
mesh_max: 273,250       #max probe range
probe_count: 5,5
fade_start: 1
fade_end: 10
algorithm: bicubic

[bed_screws]
screw1: 25, 33
screw2: 262, 33
screw3: 262, 272
screw4: 25, 272


[gcode_arcs]
#resolution: 1.0

[printer]
kinematics: cartesian
max_velocity: 300
max_accel: 4000
max_z_velocity: 10
max_z_accel: 1000
square_corner_velocity: 5.0

[exclude_object]

[include timelapse.cfg]
[include cx_gmcro.cfg]
Artillery Sidewinder X1 (SWX1)
SWX1 landing page.
SWX1 with a BTT SKR 2
[include shell_command.cfg]
[include fluidd.cfg]
[include mainsail.cfg]

# This file contains common pin mappings for the BigTreeTech SKR 2.
# To use this config, the firmware should be compiled for the
# STM32F407 with a "32KiB bootloader".

# In newer versions of this board shipped in late 2021 the STM32F429
# is used, if this is the case compile for this with a "32KiB bootloader"
# You will need to check the chip on your board to identify which you have.
#
# The "make flash" command does not work on the SKR 2. Instead,
# after running "make", copy the generated "out/klipper.bin" file to a
# file named "firmware.bin" on an SD card and then restart the SKR 2
# with that SD card.

# See docs/Config_Reference.md for a description of parameters.

# Note: The initial revision of this board has a flaw that can cause
# damage to itself and other boards. Be sure to verify the board is
# not impacted by this flaw before using it.

[stepper_x]
step_pin: PE2
dir_pin: !PE1
enable_pin: !PE3
microsteps: 16
rotation_distance: 40
endstop_pin: ^!PC1
position_endstop: 0
position_max: 300
homing_speed: 100

[tmc2209 stepper_x]
uart_pin: PE0
run_current: 0.800
diag_pin:

[stepper_y]
step_pin: PD5
dir_pin: !PD4
enable_pin: !PD6
microsteps: 16
rotation_distance: 40
endstop_pin: ^!PC3
position_endstop: 0
position_max: 300
homing_speed: 100

[tmc2209 stepper_y]
uart_pin: PD3
run_current: 0.800
diag_pin:

[stepper_z]
step_pin: PA15
dir_pin: PA8
enable_pin: !PD1
microsteps: 16
rotation_distance: 8
endstop_pin: probe:z_virtual_endstop
position_max: 400
homing_speed: 20
second_homing_speed: 1

[tmc2209 stepper_z]
uart_pin: PD0
run_current: 0.800
diag_pin:

[stepper_z1]
step_pin: PD11
dir_pin: PD10
enable_pin: !PD13
microsteps: 16
rotation_distance: 8

[tmc2209 stepper_z1]
uart_pin: PD12
run_current: 0.800
diag_pin:

[extruder]
step_pin: PD15
dir_pin: PD14
enable_pin: !PC7
microsteps: 16
rotation_distance: 33.500
nozzle_diameter: 0.400
filament_diameter: 1.750
heater_pin: PB3
sensor_type: EPCOS 100K B57560G104F
sensor_pin: PA2
#control: pid
#pid_Kp: 22.2
#pid_Ki: 1.08
#pid_Kd: 114
min_temp: 0
max_temp: 250

[tmc2209 extruder]
uart_pin: PC6
run_current: 0.600
diag_pin:

[heater_bed]
heater_pin: PD7
sensor_type: EPCOS 100K B57560G104F
sensor_pin: PA1
#control: pid
min_temp: 0
max_temp: 130
#pid_kp: 42.365
#pid_ki: 0.545
#pid_kd: 822.940

[fan]
pin: PB7

[heater_fan fan1]
pin: PB6

#[heater_fan fan2]
#pin: PB5

# Due to BTT implementing a Marlin-specific safety feature,
# "anti-reversal stepper protection", this pin needs pulling
# high to pass power to stepper drivers and most FETs

[output_pin motor_power]
pin: PC13
value: 1

[mcu]
serial: /dev/serial/by-id/usb-Klipper_stm32f429xx_200044001450304738323420-if00

[printer]
kinematics: cartesian
max_velocity: 250
max_accel: 3000
max_z_velocity: 50
max_z_accel: 400
square_corner_velocity: 5.0

[bltouch]
## If these change, adjust coords in [z_tilt], [safe_z_home]
sensor_pin: ^PE4
control_pin: PE5
x_offset: 29
y_offset: -34
z_offset: 10
samples: 3
samples_result:average
probe_with_touch_mode: true
stow_on_each_sample: false

[safe_z_home]
home_xy_position: 122,183
speed: 150
z_hop: 10  # Move up 10mm
z_hop_speed: 5

[bed_screws]
screw1: 55,55
screw1_name: front left
screw2: 255,55
screw2_name: front right
screw3: 255,255
screw3_name: back right
screw4: 55,255
screw4_name: back left
speed: 100.0


[screws_tilt_adjust]
screw1: 22,83
screw1_name: front left
screw2: 222,83
screw2_name: front right
screw3: 22,283
screw3_name: back left
screw4: 222,283
screw4_name: back right
speed: 100.0
screw_thread: CW-M5

[bed_mesh]
speed: 800
mesh_min: 30,30
mesh_max: 270,270
probe_count: 5,5
mesh_pps: 2,2
algorithm: bicubic
bicubic_tension: 0.2
move_check_distance: 3.0
split_delta_z: .010
fade_start: 1.0
fade_end: 5.0

########################################
# EXP1 / EXP2 (display) pins
########################################

[board_pins]
aliases:
    # EXP1 header
    EXP1_1=PC5, EXP1_3=PB1, EXP1_5=PE10, EXP1_7=PE12, EXP1_9=<GND>,
    EXP1_2=PB0, EXP1_4=PE9, EXP1_6=PE11, EXP1_8=PE13, EXP1_10=<5V>,
    # EXP2 header
    EXP2_1=PA6, EXP2_3=PE7, EXP2_5=PB2, EXP2_7=PC4,   EXP2_9=<GND>,
    EXP2_2=PA5, EXP2_4=PA4, EXP2_6=PA7, EXP2_8=<RST>, EXP2_10=<NC>

# See the sample-lcd.cfg file for definitions of common LCD displays.

[gcode_macro update_git]
gcode:
    RUN_SHELL_COMMAND CMD=update_git_script

[gcode_shell_command update_git_script]
command: bash /home/wilsonm/printer_1_data/klipper-backup/script.sh
timeout: 90.0
verbose: True
Creality CR6 SE
Creality CR6 SE landing page.
Voron 2.4 Pro+
Voron 2.4 landing page.
Zero G Mercury One.1
Mercury One.1 landing page.
Mercury One.1 with a BTT Manta M8P
[include shell_command.cfg]
[include mainsail.cfg]

# host MCU service is preinstalled and ready to use with:
[mcu CB1]
serial: /tmp/klipper_host_mcu

# This file contains common pin mappings for the BIGTREETECH Manta M8P
# To use this config, the firmware should be compiled for the
# STM32G0B1 with a "8KiB bootloader" "8 MHz crystal"
# and "USB (on PA11/PA12)" or "CAN bus (on PD12/PD13)".

# https://github.com/Klipper3d/klipper/blob/master/config/generic-bigtreetech-manta-m8p-v1.1.cfg

# See docs/Config_Reference.md for a description of parameters.

[mcu]
#@serial: /dev/serial/by-id/usb-Klipper_stm32g0b1xx_3C001B000B504B4633373520-if00
canbus_uuid=5b426f4e5253

[mcu HermitCrab]
#serial: /dev/serial/by-id/usb-Klipper_stm32f072xb_28002C000757434331363920-if00
canbus_uuid=00ee6e545867

[printer]
kinematics: corexy
max_velocity: 300
max_accel: 4000             #Max 4000
max_z_velocity: 15          #Max 15 for 12V TMC Drivers, can increase for 24V
max_z_accel: 350
square_corner_velocity: 5.0

[stepper_x] # B M1
step_pin: PE2
dir_pin: !PB4
enable_pin: !PC11
rotation_distance: 40
microsteps: 16
full_steps_per_rotation: 200  #set to 200 for 1.8 degree stepper
endstop_pin: ^PF3
position_endstop: 357
position_max: 377
homing_speed: 50
homing_retract_dist: 10

[tmc5160 stepper_x]
cs_pin: PC10
#spi_bus: spi1
interpolate: False
run_current: .7
#diag1_pin: ^!PF3
sense_resistor: 0.110
#driver_SGTHRS: 125
driver_SGT: 0
stealthchop_threshold: 0
spi_software_sclk_pin: PA5
spi_software_mosi_pin: PA7
spi_software_miso_pin: PA6

[stepper_y] # A M2
step_pin: PF12
dir_pin: !PF11
enable_pin: !PB3
rotation_distance: 40
microsteps: 16
full_steps_per_rotation: 200  #set to 200 for 1.8 degree stepper
endstop_pin: ^PF4
position_endstop: 365
position_max: 370
homing_speed: 50
homing_retract_dist: 10

[tmc5160 stepper_y]
cs_pin: PF13
#spi_bus: spi1
interpolate: False
run_current: .7
#hold_current: 1.0
#diag1_pin: ^!PF4
sense_resistor: 0.110
#driver_SGTHRS: 125
driver_SGT: 2
stealthchop_threshold: 0
spi_software_sclk_pin: PA5
spi_software_mosi_pin: PA7
spi_software_miso_pin: PA6

[stepper_z] # M3 Left
step_pin: PD7
dir_pin: !PD6
enable_pin: !PF10
microsteps: 16
rotation_distance: 2
full_steps_per_rotation: 200  #set to 200 for 1.8 degree stepper
endstop_pin: probe:z_virtual_endstop
position_max: 350
position_min: -50
homing_speed: 8.0
second_homing_speed: 3

[tmc2209 stepper_z]
uart_pin: PF9
##diag_pin: PF5
run_current: 0.7
sense_resistor: 0.110
stealthchop_threshold: 0

[stepper_z1] # M4 Center
step_pin: PD3
dir_pin: !PD2
enable_pin: !PD5
microsteps: 16
rotation_distance: 2
full_steps_per_rotation: 200  #set to 200 for 1.8 degree stepper

[tmc2209 stepper_z1]
uart_pin: PD4
##diag_pin: PC0
run_current: 0.7
sense_resistor: 0.110
interpolate: False
stealthchop_threshold: 0

[stepper_z2] # M6 Right
step_pin: PA10
dir_pin: !PA14
enable_pin: !PA15
microsteps: 16
rotation_distance: 2
full_steps_per_rotation: 200  #set to 200 for 1.8 degree stepper

[tmc2209 stepper_z2]
uart_pin: PF8
run_current: 0.7
sense_resistor: 0.110
interpolate: False
stealthchop_threshold: 0

[extruder]
step_pin: HermitCrab: PA6
dir_pin: !HermitCrab: PA7
enable_pin: !HermitCrab: PA5
microsteps: 16
rotation_distance: 24.235
gear_ratio: 7:1
nozzle_diameter: 0.400
filament_diameter: 1.750
heater_pin: HermitCrab: PA2
sensor_type: EPCOS 100K B57560G104F
sensor_pin: HermitCrab: PA1
#control: pid
#pid_Kp: 21.527
#pid_Ki: 1.063
#pid_Kd: 108.982
min_temp: 0
max_temp: 250
max_extrude_cross_section: 4
pressure_advance: 0.05

[tmc2209 extruder]
uart_pin: HermitCrab: PB0
run_current: 0.650
sense_resistor: 0.110
interpolate: false
stealthchop_threshold: 0

[fan]
pin: HermitCrab: PA4

[heater_fan hotend_fan]
pin: HermitCrab: PA3
heater: extruder
heater_temp: 50.0

#####################################################################
#   Bed Heater
#####################################################################

[heater_bed]
##	SSR Pin - BED_OUT
heater_pin: PB5
sensor_type: ATC Semitec 104GT-2
sensor_pin: PA0
##	Adjust Max Power so your heater doesn't warp your bed
max_power: 0.7
min_temp: 0
max_temp: 120
#control: pid
#pid_kp: 58.437
#pid_ki: 2.347
#pid_kd: 363.769


[board_pins]
aliases:
    # EXP1 header
    EXP1_1=PE9, EXP1_2=PE10,
    EXP1_3=PE11, EXP1_4=PE12,
    EXP1_5=PE13, EXP1_6=PE14,    # Slot in the socket on this side
    EXP1_7=PE15, EXP1_8=PB10,
    EXP1_9=<GND>, EXP1_10=<5V>,

    # EXP2 header
    EXP2_1=PB14, EXP2_2=PB13,
    EXP2_3=PF7, EXP2_4=PB12,
    EXP2_5=PE7, EXP2_6=PB11,      # Slot in the socket on this side
    EXP2_7=PE8, EXP2_8=<RST>,
    EXP2_9=<GND>, EXP2_10=<NC>

# See the sample-lcd.cfg file for definitions of common LCD displays.

#####################################################################
#   Probe
#####################################################################

[safe_z_home]
home_xy_position: 188,185
speed: 150
z_hop: 10  # Move up 10mm
z_hop_speed: 5

[bltouch]
sensor_pin: ^HermitCrab:PB2
control_pin: HermitCrab:PB1
x_offset: -31.8
y_offset: -40.5
#z_offset: 4 # Uncomment if starting fresh; Distance should be enough to keep the z-offset positive.
speed: 5.0
pin_move_time: 0.7
lift_speed: 8
pin_up_touch_mode_reports_triggered: True
probe_with_touch_mode: True
samples: 2
samples_result: median
sample_retract_dist: 6.0
samples_tolerance: 0.05
samples_tolerance_retries: 3

[bed_mesh]
speed: 300
mesh_min: 30,30
mesh_max: 345,329
probe_count: 5,5
mesh_pps: 2,2
algorithm: bicubic
bicubic_tension: 0.2
move_check_distance: 3.0
split_delta_z: .010
fade_start: 1.0
fade_end: 10.0

[screws_tilt_adjust]
screw1: 360,13.5
screw1_name: front_left
screw2: 360,363
screw2_name: front_right
screw3: 185,10
screw3_name: back_middle
# Additional bed leveling screws. At least two screws must be
# defined.
speed: 50
horizontal_move_z: 5
screw_thread: CW-M3

[bed_screws]
screw1: 360,13.5
screw2: 360,363
screw3: 185,10

[z_tilt]
z_positions:
  10,13.5
  185,350
  355,13.5

points:
  0,55
  155,365
  325,55

speed: 200
horizontal_move_z: 15
retries: 10
retry_tolerance: 0.03 #0.0075

#####################################################################
#   PInput Shaping
#####################################################################

[adxl345]
cs_pin: HermitCrab: PB12
spi_bus: spi2
axes_map: y,z,-x

[resonance_tester]
accel_chip: adxl345
probe_points:
    188,185, 20  # middle of bed as an example

[input_shaper]
shaper_freq_x: 43.0
shaper_type_x: 2hump_ei
shaper_freq_y: 52.6
shaper_type_y: 2hump_ei

#####################################################################
#   Macros
#####################################################################

# All customizations are documented in globals.cfg. Just copy a variable from
# there into the section below, and change the value to meet your needs.

[gcode_macro _km_options]
# These are examples of some likely customizations:
# Any sheets in the below list will be available with a configurable offset.
#variable_bed_surfaces: ['smooth_1','texture_1']
# Length (in mm) of filament to load (bowden tubes will be longer).
variable_load_length: 50.0
# Hide the Octoprint LCD menu since I don't use it.
#variable_menu_show_octoprint: False
# Customize the filament menus (up to 10 entries).
#variable_menu_temperature: [
#  {'name' : 'PLA',  'extruder' : 200.0, 'bed' : 60.0},
#  {'name' : 'PETG', 'extruder' : 230.0, 'bed' : 85.0},
#  {'name' : 'ABS',  'extruder' : 245.0, 'bed' : 110.0, 'chamber' : 60}]
# Length of filament (in millimeters) to purge at print start.
variable_start_purge_length: 30 # This value works for most setups.
gcode: # This line is required by Klipper.
# Any code you put here will run at klipper startup, after the initialization
# for these macros. For example, you could uncomment the following line to
# automatically adjust your bed surface offsets to account for any changes made
# to your Z endstop or probe offset.
#  ADJUST_SURFACE_OFFSETS
variable_park_x: 10.0
# Y position to park toolhead (set "max" or "min" to infer from stepper config).
variable_park_y: 350.0

# This line includes all the standard macros.
[include klipper-macros/*.cfg]
# Uncomment to include features that require specific hardware support.
# LCD menu support for features like bed surface selection and pause next layer.
#[include klipper-macros/optional/lcd_menus.cfg]
# Optimized bed leveling
[include klipper-macros/optional/bed_mesh.cfg]

# The sections below here are required for the macros to work. If your config
# already has some of these sections you should merge the duplicates into one
# (or if they are identical just remove one of them).
[idle_timeout]
gcode:
  _KM_IDLE_TIMEOUT # This line must be in your idle_timeout section.

[pause_resume]

[respond]

[save_variables]
filename: ~/printer_data/config/variables.cfg # UPDATE THIS FOR YOUR PATH!!!

[virtual_sdcard]
path: ~/printer_data/gcodes # UPDATE THIS FOR YOUR PATH!!!
on_error_gcode: CANCEL_PRINT

[display_status]

[exclude_object]

[gcode_macro update_git]
gcode:
    RUN_SHELL_COMMAND CMD=update_git_script

[gcode_shell_command update_git_script]
command: bash -c "bash $HOME/klipper-backup/script.sh"
timeout: 90.0
verbose: True
3D Printer and 3D Printing Accessory Reviews
Over the past couple of years, I have had an opportunity to try many different 3D Printers and 3D Printing parts/accessories. In this section, I will document the various products I have either tested or used.
Level Up Your 3D Printer! FIXDRY DOUBLE-NT1 Filament Dryer Box Review & Demonstration
red of battling wet filament and failed 3D prints? Struggling to keep your prints crisp and free of warping?
In this video, we take action! We unbox and put the FIXDRY DOUBLE-NT1 Filament Dryer to the test. See for yourself how this 2-spool dryer can transform your printing experience.
We’ll show you exactly how it works, test its drying capabilities, and reveal if the FIXDRY DOUBLE-NT1 is the key to unlocking perfect prints. Don’t waste another minute on failed projects - watch now and take control of your filament!
Plus: Stick around for a special bonus at the end - we’ll share our top tips for getting the most out of your filament dryer!
FIXDRY 3D Filament 2 Spools Compatible Dryerbox DOUBLE-NT1: https://bit.ly/3vSfOOa
Amazon Link: https://amzn.to/4apTZEN
M3DP Tutorials
These are the tutorials I have created over the years. I have tried to create playlists on YouTube. My focus is 3D printing slicers, Klipper, and Marlin setups. I also do a lot of videos on repairing 3D printers. I am always looking for new ideas. Don’t hesitate to reach out with some suggestions.
Orca Slicer Tutorials
Orca Slicer landing page.
According to Prusa3D, Max Volumetric Speed is defined as:
The Maximum volumetric speed setting (MVS) is one of the most powerful features in PrusaSlicer. The MVS setting essentially creates a manager for the maximum amount of filament that the slicer will attempt to push through your 3D printer’s hotend.
Dial in Your Prints: OrcaSlicer Max Flow Rate Calibration Test
Stop printing with gaps and blobs! Master your flow rate with OrcaSlicer’s built-in Max Flow Rate Calibration Test.
This beginner-friendly tutorial will guide you step-by-step through the entire calibration process. Learn how to:
Say goodbye to under-extrusion and hello to smooth surfaces and sharp details! This video is perfect for anyone who wants to take their 3D printing to the next level with OrcaSlicer.
Calibration Spreadsheet: https://docs.google.com/spreadsheets/d/1LlSHsa86RuT_btswmDsmQp0LrTJ9U0HJcRhorsqz1ug/edit?usp=sharing
References:
#3dprinting #klipper #3dprinter #orcaslicer
Ultimake Cura Tutorials and References

Cura GitHub - Cura Logo
Photo: Various
Cura Tutorials Landing Page.
Downloading and Installing Cura
*.exe for Windows, *.dmg for Mac).(1) UltiMaker Cura - UltiMaker. https://ultimaker.com/software/ultimaker-cura/. (2) Install Ultimaker™ Cura on Ubuntu using the Snap Store - Snapcraft. https://snapcraft.io/install/cura-slicer/ubuntu. (3) UltiMaker Cura installation. https://support.ultimaker.com/s/article/1667410778218. (4) How to Use Ultimaker Cura to Prepare Designs for 3D Printing. https://www.tomshardware.com/how-to/use-ultimaker-cura-to-prepare-designs-for-3d-printing. (5) Cura. https://ultimaker.com/software/ultimaker-cura.
As I plan projects, I wanted a place where I could gather my thoughts and plans. I also want to start keeping project journals.
It usually takes me a while to work on my various projects. I store references all over the place. I am hoping that this could be a place for me to gather everything. As I work in a project, I would like to be able to document the process.
I have alot of projects planned for Minimal 3DP. I look forward to getting to work and sharing.
Voron 2.4 R2 Project log and References
Voron 2.4 R2 landing page.
Build references and links for the Voron 2.4 R2 Pro+ FormBot kit. I needed a centralized location for all the reference material I need to build the 3D printer.
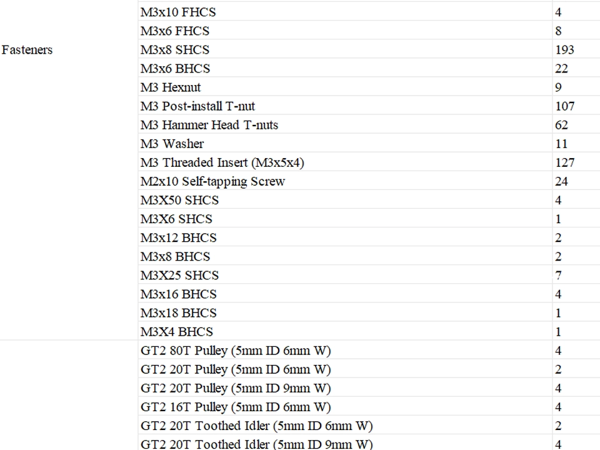
Parts List for the Voron 2.4 R2 Pro+ FormBot kit. I will show the parts list from FrormBot but at the end of the page I will include my cross-checks.
FormBot Parts List
FormBot Parts List

Photo: Various Sources
In this section, I will be building the frame of my Voron 2.4 R2 Kit
References and Links
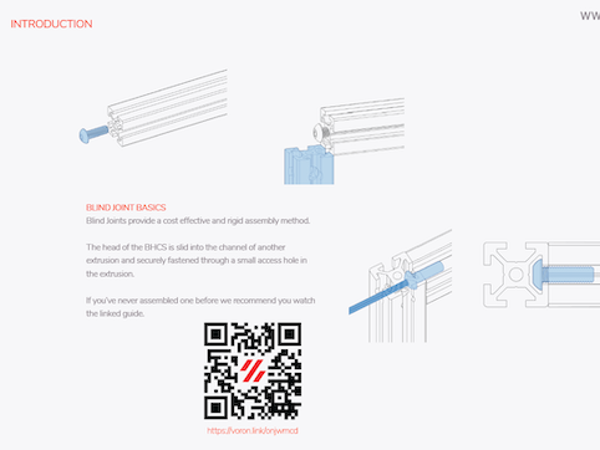
The Voron assembly manual starts with the building of the frame. I will start from this point.

Voron Build Guide - Blind Joints
Photo: Various
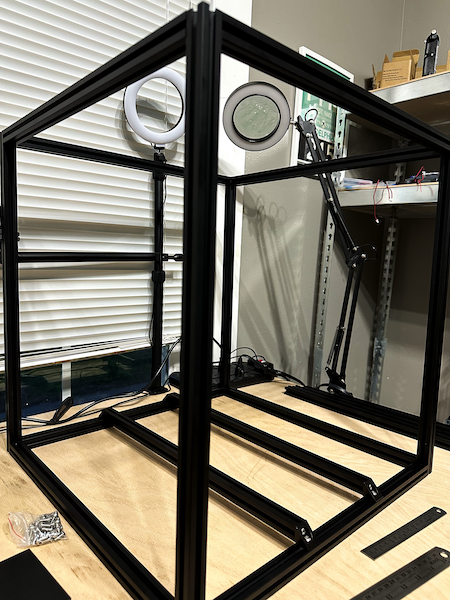
Using the blind joints. The Frame is assembled.

Assembled Frame
Photo: Various
Belt Driven Ender 3 Project Log and References
Belt Driven Ender 3 landing page.
vzBot Project log and References
vzBot landing page.